Hello Friends, Today I am going to show you how to create an OSB service to serve the purpose of sending the Email Notifications to recipients.
In order to proceed with creating the OSB Service, we will need few details handy as below:-
a) Server URL
b) Port Number
c) User Name
d) Password
Once we are done with the above details we will create SMTP Server in OSB Project.
Let's start with the whole flow one by one:-
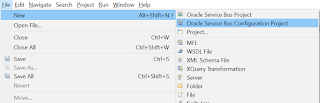
1. Creating SOB Configuration Project, OSB Project and SMTP Server
Go to File->New->OracleServiceBusConfigurationProject
Give any name such as "OSBConfigurationBlog"


Fill details as per your requirement. A Sample is given below:-

2. Creating Business Service
Right click on the OSB Project name and Search for "Business Service" to open "Create a Business Service" wizard as below. Name is as "BlogSendEmailBS"


Save. Business Service configuration is done.
3. Creating XSD and WSDL
Before creating proxy service we need to create an XSD and WSDL in order to follow a schema for request message to the OSB service:-
Create XSD and WSDL as follows:-
a) EmailSchema.xsd [This is the schema/xsd file. This file is created first]

b) NotificationService.wsdl [This is the WSDL file used for creating Proxy Service]

Once WSDL and XSD is created in the project folder, we can proceed with creating Proxy Service.
4. Creating Proxy Service
In Order to create the Proxy Service, please follow below steps


Proxy Service is created. Now go to "Message Flow" Tab of the proxy service in order to create the flow of the OSB Service
Right Click on the "BlogSendEmailPS" root node and add a "Pipeline Pair Node" as below:-

Right Click on "Request Pipeline" of "PipelinePairNode1" and add a "Stage" to it as below:-

Right Click on the "Stage1" and add a "Publish" action to it and also specify the service name to call to that "Publish" action as follows:-


Now, we will add some properties to this "Publish" Action which will help us set some information to be passed to the "BlogSendEmailBS.biz" service in order to call it successfully
Right Click on "Request Action" of "Publish" and add "Transport Header" to it


Now click on this "Transport Headers" and you will see "Transport Headers" properties to set in properties tab
Now set "To", "From", "Cc" and "Subject" properties as below:-

Now add a "Replace" action after this "Transport Header" in order to set the "Body" variable which will work as the content of the E-mail
Do this as below:-

Now we are done with this exercise with the creation of this Proxy Service. Go ahead.. deploy and test your service!
In order to proceed with creating the OSB Service, we will need few details handy as below:-
a) Server URL
b) Port Number
c) User Name
d) Password
Once we are done with the above details we will create SMTP Server in OSB Project.
Let's start with the whole flow one by one:-
1. Creating SOB Configuration Project, OSB Project and SMTP Server
Go to File->New->OracleServiceBusConfigurationProject


Once done, create OSB Project as above and give a name "OSBProjectBlog1 "
Now, Right click on the OSB Configuration Project name and search for "SMTP"
Open "Create a new SMTP Server" wizard

Fill details as per your requirement. A Sample is given below:-

2. Creating Business Service
Right click on the OSB Project name and Search for "Business Service" to open "Create a Business Service" wizard as below. Name is as "BlogSendEmailBS"

configure the business service as followed in the pictures below:-


Save. Business Service configuration is done.
3. Creating XSD and WSDL
Before creating proxy service we need to create an XSD and WSDL in order to follow a schema for request message to the OSB service:-
Create XSD and WSDL as follows:-
a) EmailSchema.xsd [This is the schema/xsd file. This file is created first]

b) NotificationService.wsdl [This is the WSDL file used for creating Proxy Service]

Once WSDL and XSD is created in the project folder, we can proceed with creating Proxy Service.
4. Creating Proxy Service
In Order to create the Proxy Service, please follow below steps


Proxy Service is created. Now go to "Message Flow" Tab of the proxy service in order to create the flow of the OSB Service
Right Click on the "BlogSendEmailPS" root node and add a "Pipeline Pair Node" as below:-

Right Click on "Request Pipeline" of "PipelinePairNode1" and add a "Stage" to it as below:-

Right Click on the "Stage1" and add a "Publish" action to it and also specify the service name to call to that "Publish" action as follows:-


Now, we will add some properties to this "Publish" Action which will help us set some information to be passed to the "BlogSendEmailBS.biz" service in order to call it successfully
Right Click on "Request Action" of "Publish" and add "Transport Header" to it


Now click on this "Transport Headers" and you will see "Transport Headers" properties to set in properties tab
Now set "To", "From", "Cc" and "Subject" properties as below:-

Now add a "Replace" action after this "Transport Header" in order to set the "Body" variable which will work as the content of the E-mail
Do this as below:-

Now we are done with this exercise with the creation of this Proxy Service. Go ahead.. deploy and test your service!


